Just because it’s messy doesn’t mean it’s not fun and easy to clean up – not to mention the hours of smile and fun that await your toddler!

The idea of messy play supports the exploration of the world’s textures and sensations to simulate happy and curious minds and involve more of the senses during the learning process. Introducing different sensations to your toddler through messy play enables their brain to establish new connections – which is crucial to everything we do and learn in our early years.

And it’s not just for the little ones, parents can enjoy the benefits of messy play too. With your child captivated by the activity, this gives you an opportunity to explore and encourage in-home learning and spend quality time with your child.

Ready to play? It’s time to roll up those sleeves and get our creativity flowing with these 10 messy play ideas.


1. Dinosaurs in Taste-Safe Mud

Realistically mud always comes up in the conversation about messy play. By making it “taste-safe” parents eliminate the fear of real mud consumption, while still giving the child the opportunity to get messy without consequence. 

Here’s what you’ll need; 

  • Corn starch (2 cups)
  • Water
  • Powdered hot chocolate or cocoa powder (1 cup)
  • Dinosaur toys (assorted mix)
  • Container for mud
  • Spoon

The first thing you’ll want to do is combine the cornflour and cocoa powder in a large mixing bowl. For the desired thickness (or runny-ness) of the mud, add small amounts of water to the bowl. Generally, we like to do the one cup of water to two cups of cornflour and one cup of cocoa powder method, but that’s not an airtight rule. Finally, add your child’s favourite toy dinosaurs and they’re ready for some muddy fun. Farm and zoo animals work great as well!


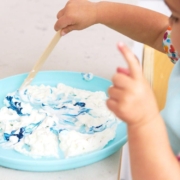
2. Fizzy “Cloud Dough” Observation

The idea is to create a variety of new connections for your toddler’s brain which include both visual and sensory stimulation. The dough is gentle, colourful, and easy to put together. We recommend enjoying this activity outdoors or in a bathtub for easy cleanup.

Here’s what you’ll need;

  • Flour (1 cup)
  • Baking soda (1 cup)
  • Vegetable oil (¼ cup)
  • Oil-based or powder food colouring
  • Vinegar
  • Large mixing bowl
  • Tub or container

Begin by making your sensory – and taste-safe – play dough by combining the flour, vegetable oil and colouring. Next, put the dough into the container and allow your children to explore by moulding and shaping it. Then, add a bit of vinegar and baking soda to the dough to bring the fizz out. The little ones will have a wonderful time grabbing the foam and watching the bubbles.


3. Balloon Painting

The idea of this activity is to stimulate spatial awareness by giving a new spin on painting – a favourite among most children – and creates an added challenge by incorporating coordination skills. Children will come away from this activity with a pure sense of accomplishment!

Here’s what you’ll need;

  • Balloons
  • Child-friendly washable paint
  • Cardboard or large sheets of paper
  • Large safety pins
  • Funnel (not required)

Be sure to clear a large workspace that can withstand messy paint and splatters. To start, fill your balloons with paint – we recommend using the funnel for a cleaner result – or enjoy more sensory fun by allowing your toddler to fill without the funnel. 

Tie off the balloons at the top and use the safety pin to poke small holes in the bottom. Embrace mistakes that might occur as the children apply paint to the cardboard by squeezing it out of the balloons. If the balloon inevitably falls, embrace the splatters as part of the creative process.


‍4. “Under the Sea” Jelly Exploration

Sticky, squishy… Jelly! What’s not to love! This underwater exploration gives thought to our large and beautiful underwater world. As a bonus, it’s a snack after they’re done exploring!

Here’s what you’ll need;

  • Jelly mix (blue is best to look like the ocean)
  • Underwater or aquatic animal toys
  • A large container

First, add some jelly to set in a plastic container. After pouring your jelly liquid into the container, add your selected underwater creatures. Once set the messy play begins by digging for the creatures and enjoying a nice “oceany” jelly snack along the way!


5. Melting Colourful Ice Cubes

This activity allows toddlers to explore the different states of water. It’s perfect for a hot day, as it shows the power of the sun – not to mention provides messy cooling at the same time.

Here’s what you’ll need;

  • Ice cube trays
  • Water
  • Food colouring or non-toxic dye (we recommend washable dye)
  • A large plastic container (or outdoor area)
  • Towels (they will get stained if a non-washable dye is used)

Even though it’s one of the more simple ideas, it’s still a very powerful visual and sensory play idea for toddlers. You’ll start by simply filling the ice cube trays with water and adding a few drops of colouring. Once frozen, add the colourful cubes to a container to take outside. Finally, dive in – literally! Have your child jump in the colourful swimming tub and enjoy!

In this blog, we’re going to learn how to make beautiful bubble art. Remember sitting at a restaurant waiting for your food to arrive whilst blowing bubbles into your drink with a straw? Keeping that in mind, let’s now turn this scientific exploration into a fascinating art project for you and your child. With just a few drops of washing-up liquid and food colouring, together you’ll create artwork with a fascinating and unique pattern.

Materials needed:

  • Paper (or plastic) straws
  • Liquid food colouring
  • washing-up liquid
  • Plain stationery or printer paper
  • Stickers (optional)

Instructions:

  1. Add a couple of drops of food colouring, about 20mls of water, and several drops of washing up liquid to a wide-rimmed cup or bowl (disposable ones are recommended for easy clean up). 
  2. Using a drinking straw blow until the bubbles rise just above the container rim.
  3. With your paper in hand, gently lower down on top of the bubbles, then lift off slowly. The bubbles will pop from the weight of the paper leaving a unique circular transfer.
  4. For a more intricate pattern repeat steps 2 and 3, until you’re happy with the results. For more variety in the pattern, we recommend using more than one colour mixture.
  5. Optional: Add fish stickers or have your child draw their own to create an interactive underwater seascape (glue to secure if required).

Pro Parent Trick: To prevent your child from sucking up bubbles, near the top of the straw cut out a small notch in a triangle shape and throw it away to avoid a choking hazard.

Why is bubble art important for early development?

Bubbles are an excellent way for your toddler to practise visual tracking skills in their early years. As we are not born with these skills it’s important to introduce them to allow for development over time. Other skills that need to be taught include the ability to fix, follow, track, focus, and so on.

Learning the concept of gardening for toddlers can help build a variety of valuable motor skills that you, as a parent, might not even have considered. Gardening can help teach your children to feel different textures of soil, seeds, flower and petals. More importantly, for improving their future academic skills in writing, cutting and typing.

One of our favourite activities that demonstrates this is grass growing! In this blog, we will be discussing how to set up a little gardening project that will keep your children entertained (with little adult support) for months to come!

Even as an adult, it amazes me that a handful of seeds can turn into an entire back garden on wonderfully green grass. Start by explaining the type of seed you plan to grow, how they feel, and look. Allow your toddler to explain what they think will happen when you add them to soil and water them over time. 

It is time to create our nature monster! What is needed…

Most of these items can either be found at your local garden centre, online or by recycling!

  • Potting soil… we recommend using soil or dirt from your back garden, as every child enjoys the art of digging! Go for the top, looser bits of soil if using this alternative.
  • Grass seed
  • Plastic containers (6–12 cm deep)… recycled food packaging works perfectly.
  • Watering can… the one with a rose sprinkler is best.
  • Spray bottle

How it’s done…

  1. Fill your recycled containers with potting soil or back garden dirt.
  2. For the first watering, use your watering can and make sure the soil is completely wet, but not drowning.
  3. Sprinkle a handful of grass seed over the entire surface of the soil.
  4. Gently spray the seeds using your spray bottle.
  5. Place your recycled containers on a window sill with plenty of sunlight. If your window sill isn’t wide enough, place your containers on a table near the window to catch the sun. To promote growth throughout the process, don’t forget to rotate your containers for even sun exposure.
  6. Make sure you are spraying your grass seeds daily and that the soil is thoroughly dampened.
  7. At this stage of the process, you should start to see the first bit of growth coming in as reddish-brown grass shoots, which will turn green within 1-2 days.

Congratulations, the “grass growing” is complete. However… as plants are organisms that can continue to grow, we recommend starting a growth calendar. Your child can track daily watering, when the seeds were planted and started to see grass shoots, and how often they gave the grass a “hair cut”.

Download our printable growth calendar here.

Circling back to fine motor skills, when the grass has grown nice and tall, your child can, with parent supervision, practice cutting the grass to tend their garden using safety scissors. Let them know the importance of cutting the grass, as it will help the grass grow big & strong, just like when we eat our vegetables!

Although we are currently in Summer and gardening season might be best suited for a Springtime activity, there truly is no better time to educate your child on gardening. Key factors being various plants, how they give us oxygen, and being outside and away from screens in general. Connecting with nature is a vital skill for all ages and should be practised daily by recycling, not littering, and walking when possible.

Planning on going to the beach this Summer? Maybe you’ve got a park nearby or some sand in your back garden? We’ve got the perfect outdoor craft activity you can literally do anywhere, plus it keeps your children entertained for hours on end. Sand art is a fun and easy activity to put together and clean up is a breeze. It’s also an excellent activity for practising fine motor skills and creativity.

What you’ll need:

  • Cardboard or thick paper (darker colours will help the sand stand out)
  • Pencil (lighter colours are better for covering fully with sand)
  • Glue (regular PVC glue works great)
  • String or yarn (optional for displaying)
  • Hole punch (we recommend doing this beforehand)
  • Sand!

Let’s get crafting…

  1. Sketch a design on the cardboard. Some of our class favourites are flowers!
  2. Go over all the lines with glue. This is great practice for fine motor control!
  3. Sprinkle the sand all over the wet glue. We created a funnel out of paper for a more controlled sand application.
  4. Shake off the excess sand and enjoy your beautiful masterpiece.
  5. To hang the artwork, use a thick thread or yarn through pre-punched holes.

Let the glue dry fully before handling the artwork. Finally, encourage your child to continue to create and explore by displaying the young artists work.

Let’s explore some fine motor skills you can practise over the Summer with your children.

Examples of fine motor skills:

  • Academics: scribbling, making marks, drawing, writing, and cutting.
  • Play: construction skills using legos, puzzles, and train tracks.
  • Self-care: tying shoelaces, putting on sandals, zips, buttons, and belts.